Emergency & Help
24/7 Emergency & General Advisory
🚨 24/7 Medical Emergency
Welcome to Doctar
Join our healthcare community
Free Eye Test
AI powered and calibrated eye test
24/7 Emergency & General Advisory
🚨 24/7 Medical Emergency
Join our healthcare community
Considering a conch piercing? Learn about the process, pain levels, jewellery options, and essential aftercare for a successful healing journey. Get ready for your new ear adornment!

Understanding the Conch Piercing: A Comprehensive Guide The conch piercing, named for its resemblance to the spiral of a conch shell, is a popular choice for those looking to adorn their ears with unique jewellery. This piercing is located in the inner cup-shaped area of the ear, offering versatility in placement – you can opt for the inner conch, higher up and parallel to the daith, or the outer conch, lower down and closer to the antihelix. Some even choose to pierce both for a striking effect. If you're considering this bold ear adornment, it's essential to understand the process, potential pain, and the critical aftercare involved. This guide aims to provide you with all the information you need to make an informed decision and ensure a smooth healing journey. The Piercing Process: Needle vs. Dermal Punch When it comes to getting a conch piercing, there are two primary methods your piercer might use: Piercing Needle: This is the most common and generally preferred method. Your experienced piercer will meticulously clean the chosen area, mark the exact spot for the piercing, and then swiftly insert a sterile needle, followed by your selected jewellery. The entire procedure is quick, often taking just a few minutes. Dermal Punch: If you have your heart set on wearing larger, statement jewellery pieces in your conch, your piercer might suggest a dermal punch. This technique uses a small, specialised tool to remove a tiny circle of cartilage, essentially creating a clean hole for larger jewellery. It's often considered for those who want to accommodate specific jewellery styles from the outset. What Happens During Your Appointment? Regardless of the method used, a professional piercing appointment follows a standard, hygienic procedure: Cleaning: The piercer will thoroughly clean your ear to minimise the risk of infection. Marking: They will use a surgical marker to indicate the precise location for the piercing. This is your opportunity to confirm you're happy with the placement – don't hesitate to ask to see it before they proceed. Piercing: Once you've approved the mark, the piercer will use either a needle or a dermal punch to create the piercing. Jewellery Insertion: Your chosen jewellery will be carefully inserted into the fresh piercing. It's important to select appropriate starter jewellery, typically made from high-quality materials. Pressure Application: The piercer may apply gentle pressure to the area for a few minutes to help reduce any immediate bleeding. Final Clean: A final cleaning will be performed to remove any remaining blood and further reduce infection risk. Understanding the Pain Factor Pain is subjective, and what one person experiences may differ significantly for another. However, it's widely acknowledged that a conch piercing can be more uncomfortable than piercings in softer tissue, like the earlobe. This is because the needle or punch must pass through the thick cartilage of the conch. You can feel the difference by touching your ear – the conch is noticeably firmer than other parts. During the procedure: You can expect a sharp, intense pain and a feeling of pressure. Thankfully, this sensation is very brief, lasting only for the seconds it takes to complete the piercing. Immediately after: Once the initial shock subsides, you'll likely experience a hot, throbbing sensation in the pierced area. This discomfort can linger for a period, the duration of which varies from person to person. Common Patient Scenario: Maya, a 22-year-old student, was excited about her new conch piercing. She braced herself for the pain, and while the initial needle felt sharp, it was over quickly. Afterwards, her ear felt warm and throbbed gently. She found that a cool compress helped manage the discomfort during the first evening. Choosing the Right Jewellery Material The material of your initial jewellery is paramount for healing. Opt for solid 14- or 16-karat gold. It is vital to avoid gold-plated jewellery, as the plating can flake off, exposing you to nickel and other alloys that can cause allergic reactions and hinder healing. Implant-grade stainless steel or titanium are also excellent, hypoallergenic choices for initial piercings. Healing Timeline and Aftercare Essentials Patience is key when it comes to healing a conch piercing. The healing process is significantly longer than for simpler piercings: Needle-pierced conch piercings: Typically take 6 to 9 months to heal fully. Dermal-punched conch piercings: Can take a year or even longer to achieve complete healing. Diligent aftercare is non-negotiable to prevent complications like infection, excessive swelling, or keloids. Follow these steps consistently: Daily Cleaning Routine Clean your piercing at least twice a day for the first 3 months , and continue with once-daily cleaning for as long as recommended by your piercer. Saline Solution: Your Best Friend You can use a store-bought sterile saline wound wash or create your own by dissolving 1/8 to 1/4 teaspoon of non-iodised sea salt into one cup of distilled or bottled warm water. Avoid using regular table salt, as it often contains additives that can irritate the piercing. The Sea Salt Bath Method Once a day, perform a sea salt bath. Gently warm your saline solution. You can use a clean mug or a shallow bowl. Tilt your head so that your ear is submerged in the solution for 3 to 5 minutes. This helps to clean the piercing thoroughly and can soothe any discomfort or swelling. What to Avoid During Healing Don't touch your piercing with unwashed hands. Avoid sleeping on the pierced ear. Consider using a travel pillow to keep pressure off it. Steer clear of swimming pools, hot tubs, and other bodies of water that may harbour bacteria. Refrain from using harsh soaps, alcohol, or hydrogen peroxide, as these can damage the delicate healing tissue. Be cautious with headphones and hair products that might come into contact with the piercing. Avoid changing your jewellery too soon. Wait until your piercer confirms it's fully healed. Potential Complications and How to Manage Them While conch piercings are generally safe when performed by a professional and cared for properly, complications can arise. Being aware of these can help you address them promptly: Infection: Signs include increased redness, swelling, warmth, pus discharge (often yellow or green), and persistent throbbing pain. If you suspect an infection, contact your doctor or a qualified medical professional immediately. Swelling: Some swelling is normal, especially in the initial days. Applying a cool compress (not ice directly on the skin) and keeping your head elevated can help. Migration or Rejection: In rare cases, the body may push the jewellery out. If the jewellery starts to move significantly or the piercing seems to be migrating, consult your piercer. Keloids: These are raised scars that can form around piercings. While they can be a cosmetic concern, they are generally not medically dangerous. Consult a dermatologist if they become problematic. When to Consult a Doctor or Piercer It's important to distinguish between normal healing discomfort and signs of a serious problem. You should seek professional advice if you experience any of the following: Severe, worsening pain that doesn't improve with aftercare. Thick, coloured discharge (yellow, green, or foul-smelling) that is not clear or slightly whitish. Fever or chills, which could indicate a systemic infection. Significant, uncontrolled bleeding. The piercing seems to be closing up or the jewellery is becoming embedded in the skin. You develop a large, painful lump around the piercing site that doesn't resolve with home care. Always consult your piercer for issues related to the piercing itself, such as jewellery choice, placement concerns, or healing progression. For signs of infection or other significant health issues, your doctor is the best point of contact. Frequently Asked Questions About Conch Piercings Q1: Can I use earbuds or headphones with a conch piercing? It's best to avoid using earbuds or headphones that insert directly into the ear canal for the first few months, as they can irritate the piercing and disrupt healing. Over-ear headphones are usually fine, but be careful not to snag the jewellery. Q2: How long until I can change my jewellery? You should not change your jewellery until the piercing is fully healed, which can take 6-9 months or longer. Your piercer will advise you on the appropriate time to switch to different jewellery. Q3: Can acupuncture help with conch piercing pain? While some research suggests auricular acupuncture might offer pain relief for certain conditions, its effectiveness specifically for the pain of a conch piercing is not well-established. Furthermore, the timing for acupuncture treatment might not align with the immediate need for pain management post-piercing. Q4: What if I have an allergic reaction to my jewellery? If you experience itching, redness, or a rash, you might be reacting to the jewellery material. Switch to a high-quality material like titanium or implant-grade surgical steel, and consult your piercer or a doctor. Q5: Can I get both conch piercings done at the same time? While possible, it's generally recommended to get one conch piercing at a time. Healing two significant cartilage piercings simultaneously can be challenging and increase the risk of complications due
In summary, timely diagnosis, evidence-based treatment, and prevention-focused care improve long-term health outcomes.
Visit Hospital
Near You
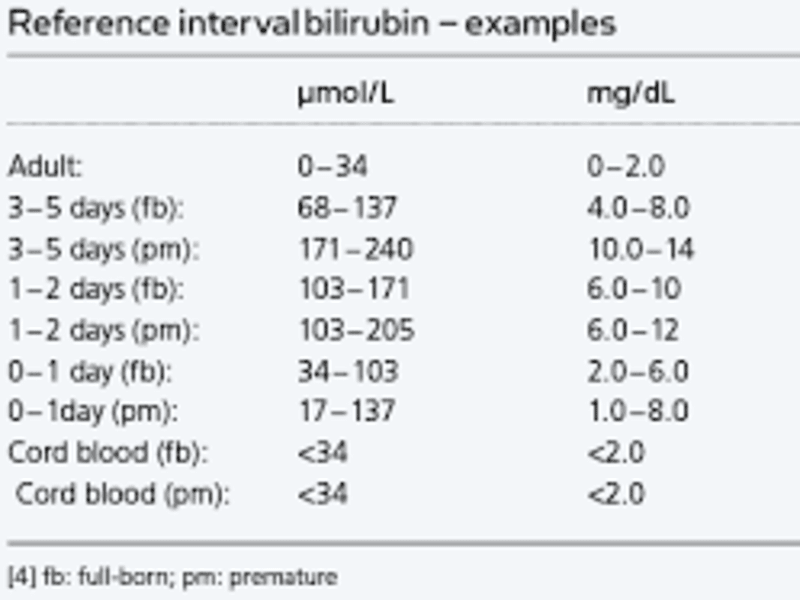
Bilirubin levels help assess liver health. This guide explains normal bilirubin values, types, causes of abnormal levels, symptoms, and when to seek medical advice.
April 11, 2026

Learn how to properly clean and care for your new ear piercing to ensure it heals beautifully and avoid infection. Follow our step-by-step guide for optimal results.
April 1, 2026

Discover practical, science-backed tips to sharpen your reaction time for gaming, sports, and everyday life. Learn how to improve your brain's speed and accuracy.
April 1, 2026